Friday, September 27, 2013

Post-it Note Template and Tutorial Gone Vintage!

Hi Everyone,

I have a fun tutorial for you using 3" x 3" Post-it Notes and a blank Template to custom notes. I used a combination of our Office 101 Digital Stamps and a witch lady from our Halloween CD, as well as other ideas farther below.  Think of all the possibilities - you can print any text and designs you can fit in the 6 squares on Post-it Notes. This is a great idea for teachers, chores lists, organizing, print a map to an event - anything you would use post-it Notes for and want a custom look!


 Here's our Blank Template which you can save if you left click it with your mouse until it gets as large as possible and right click it with your mouse to save it to your computer. Be sure to save it where you can find it easily and print 1 blank copy on plain 8.5 x 11" paper.

 All you really need to learn is how to re-size and place images and text inside the 6 boxes.  Depending on what program you have, you can cut and paste, type text in Office Word, or use a free program like Paint (installed on many computers).  Everyone uses different programs so see our various Digital Tutorials here on Pintrest for Tips. 
Also, if you are new to digital you may find this post helpful on Best Free Digital Programs, Printers and Ink

I used Photoshop Elements because I can easily tilt images and text and our Office 101 Stamps are available now as a Download for $5.95. Drag, drop or paste any digital stamps,  images, photos and text you want to use on each of the squares.  You will need to shrink most images to fit.  Save your layout with your 6 designs and be sure to re-name it so you keep the original Blank Template. Just don't close it as you need to print it next.


Place 6 Post-it Notes over each of the squares on the Blank Template page.  Run this sheet with the 'Post-it Notes attached through your printer and what ever design you have open will print on the 6 squares! 

Here's our Office 101 Digital Stamps printed on 6 pastel Post-it Notes.  You can also add personalized text and make it different on each note or copy and paste the same message. 


I also played around using one of the ladies from our Halloween CD and a office clip from the Office 101 set.   I used a free font called Biker Bones to journal a Halloween invite and copied and pasted 6 to a sheet. Click image to see it and the tips larger.

Here's a layout Cindy (our graphic designer) did using our Flower Garden Digital Stamps. These would look lovely printed on pastel Post-its and you can add personal notes in any font if you don't like your handwriting.


  I had an idea to create custom color backgrounds but realized you can shrink any 12" x 12" digital paper into a 3" x 3" Post-it Note size square! The colors will be truer if you printed on white - but who has white Post-it Notes?  So I stuck to a blank template and used pastel post-its.  Still look at these pretty samples using 12" x 12" pages reduced in size.

I hope you enjoyed this quick tutorial and free template! I would love to hear any feedback and ideas you have

 Wishing you joy and creativity
Sandy  

See Our  CraftyVintageGirl.com Store
Visit us on Facebook with over 5500 Fans!  
This Blog: http://heartwarmingvintage.blogspot.com 
Our Websitehttp://www.craftysecrets.com
    

Toll Free Phone or Fax 1-888 597-8898
Local Phone 604 597-8817

 
 Crafty Secrets Head Office
15430 78 A Ave.,
Surrey, BC V3S 8R4


USA Warehouse
250 H. Street, #436
Blaine,WA 98230


Our Trip Photos - Barcelona Spain (part 1 of 3)

Hi Everyone,

Hi Everyone,  I have so many photos from our trip I had to divide them into 3 posts and I came back and added links.  This post is about our 3 days in Barcelona Spain.  Part 2 is the Costa Brava area of Spain (and some Halloween samples), Part 3 is on Provence France Markets and Shopping.    Also, here's the link to my Post-it Note Tutorial and FREE Template to create a 6 fun custom Post-it Notes

 I was lucky to celebrate our 35th wedding anniversary with my honey traveling through Spain and Provence France. We went with 2 old friends and met 2 of our daughters in Barcelona for 3 nights.

One of our favorite places was the giant market called La Boqueria which is on the most famous boulevards in the city, Rambla. The market place is packed with fresh fruit stalls, colorful produce, delis, seafood, candy, spices and a dozen bars serving tapas. You can get any fruit cup or fruit smoothie flavor for 1 Euro if you shop around.This is me and daughter Holly.


Catalan food is tasty but I'm not really into sausages or cured meats much. Boy - they really love their cured hams - jamón Ibérico is their specialty.  You can buy snack bags filled with thin slices and it's the most popular appetizer in restaurants. You could buy skewers of meat and bread here for 1 Euro


Look at this cool old dragon sign below outside of a Chinese Food restaurant


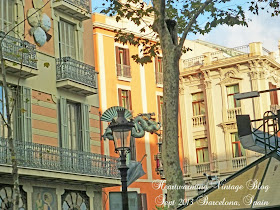
Both of these building were along the famous boulevard Rambla. I have a passion for old architecture so I was in heaven. It's the detail that is so amazing.


Below is a photo of architect Antoni Gaudí (1852–1926) who is one of Spain's most famous people and his  Modernista architectural style is showcased in buildings around the city, often incorporating his love for nature with talents in mosaic, stained glass, woodworking and other arts.

One of Gaudi's most famous houses Casa Batllo (in middle) he built between 1904 -1906.  The best way to see the city is to buy tickets for the Hop On and Hop Off Bus, or their competition Bus Turistic.  They run often and you can ride up top and hop on and off anytime.

Here it is at night. It seems like he was born born before his time as his style is so quirky

Sagrada Família church is Gaudi's most famous work and and it's still unfinished but is expected to be completed in 2025. My regret is we didn't make it inside this church and Casa Batllo as they are both supposed to be amazing.

We went to the Park Güell where Gaudi began building a subdivision of designer homes in early 1900's but after the 3 houses he built didn't sell he moved into one of the houses and the property was given to the city as a park.

We toured the inside of the house that Gaudi lived in at the park.  
He designed and built the furniture to match his funky house.


We went down to the harbor and watched cruise ships arriving and leaving. There are great seaside cafes and bars where you can sip some famous Cava Sangria and enjoy the views.


I thought they was such a cool lighting idea with all the jars

There were so many beautiful old buildings, amazing doors and woodwork! Below is my friend Mariana, husband Scott, youngest daughter Chelsea and good friend Dennis.


Here is Part 2 of vacation photos from the Costa Brava area of Spain we explored with it's medieval villages and beautiful coastline.  Plus there are some fun Halloween and Fall samples by our talented Design Team ladies.

 Wishing you joy and creativity
Sandy  

See Our  CraftyVintageGirl.com Store
Visit us on Facebook with over 5500 Fans!  
This Blog: http://heartwarmingvintage.blogspot.com 
Our Websitehttp://www.craftysecrets.com
    

Toll Free Phone or Fax 1-888 597-8898
Local Phone 604 597-8817

 
 Crafty Secrets Head Office
15430 78 A Ave.,
Surrey, BC V3S 8R4


USA Warehouse
250 H. Street, #436
Blaine,WA 98230

Thursday, September 26, 2013

Free Serenity Prayer Printable and My Dad’s GA Story

Hi Everyone,  I will be back tomorrow with photos from out trip to France and Spain and a fun project but I have a story and a FREE Printable to share today.

To honor my father’s 39 years in the Gamblers Anonymous 12 Step Program I’ve made our printable 6" x 4" Serenity Prayer Digital Stamp a FREE Printable (see below) for personal use and for any fund raising which goes to a 12 Step Recovery Program. The Serenity Prayer is used by virtually all 12-step Programs and usually recited at the beginning or end of meetings

My dad who is 86 has been feeling poorly and recently stopped driving so I drove him and my mom to their GA meeting on Sunday night.  GA or Gamblers Anonymous is a 12 step program for people that have a gambling problem, much like AA. They have been going every week for 39 years – since I was 16!  They hold meetings each Sunday night at a church and it was his GA Birthday (you have a birthday for every year you don’t gamble). My dad was a longshoreman and had a weakness for cards and horse racing. He lost so much money it was tough when we were growing up.  My mom saw an article in an Ann Landers column 40 years ago and begged him to go to a meeting. It took about a year until he finally did and they have continued to go every week. The program transformed their lives for the better!

They recall at the beginning they often sat by themselves in their own meeting when no one else came but slowly the meetings grew.  He goes to the GA meeting and my mom goes down the hall to the Gam-Anon meeting (for family members) and they help people. There was a huge turn out of people who traveled from so many areas to come celebrate his birthday. They took turns speaking and thanking him. It was very emotional and inspiring to see so many happy people in recovery. There are members of every age and nationality and so many women my age so I asked my dad if he would mind if I posted about it.  He’s happy if it will help just one person, I just can’t post any names or photos as it’s an aanonymous program.   

If you know anyone who could use help to stopgambling here’s a link and there are chapters worldwide today. I believe many families are affected by someone with an addiction, whether it’s alcohol, drugs or food, there are several 12 step programs and they work!  Even if the person with the problem won’t go to a meeting, anyone can attend the support group for those dealing with a loved one who has an addiction.  

Our design use to be a Clear Art Stamp but as our Stamp Sets sell out they are being turned into Digital Art Stamps. All of our printed products are also on CLEARANCE SALE until gone!  Vintage designs in Digital Stamps, Color Printables and CD's 
The digital stamp designs are larger, re-sizeable and it’s easy to change the color (see our free tutorials).  Just left click on the design so it's a big as possible and right click on it to save to your computer.
You can simply print it on any cardstock and frame it, make a card or reduce the size to create a magnet, bookmarks, print it on fabric transfer paper for a T-shirt design and more. I would love to see what you create!     

 My dad is all about honesty so I have to say although he's been in the program for 39 years someone asked him to flip a coin to see who would get a job at work years ago and he felt that was gambling and began his start date all over again. So Happy 25th Dad! 

UPDATE April 30/14   Sadly my father passed away on Jan 14, 2014 with his family by his side. We had a celebration of life service for him and the huge number of Gamblers Anonymous members who got up and told emotional stories of how he was always there to listen, support and help them stay with the program over the years was so touching. I know it made my dad feel very honored to be able to mentor people in the program.  Thank you to everyone for all your kind words.  

Sandy  Redburn

See Our  CraftyVintageGirl.com Store
Visit us on Facebook with over 5500 Fans!  
This Blog: http://heartwarmingvintage.blogspot.com 
Our Websitehttp://www.craftysecrets.com
    

Toll Free Phone or Fax 1-888 597-8898
Local Phone 604 597-8817

 
 Crafty Secrets Head Office
15430 78 A Ave.,
Surrey, BC V3S 8R4


USA Warehouse
250 H. Street, #436
Blaine,WA 98230

Sunday, September 22, 2013

I'm Back, Cute Baby Gifts, Halloween, Floral and Christmas Cards!

Hi Everyone! 

 I'm back from our 35th anniversary vacation and sort of recovered - if it's okay to take naps in the afternoon. There was a mountain of work here and I will post a bunch of photos ASAP from France and Spain but I need to edit them as I got so carried away and took over 600!  Here's one I love.


  I was so blessed to have 3 of our DT Ladies Vicki Chrisman, Sheila Rumney and Kathy Clement offer to do Blog Posts while I was away and if you missed seeing any of their fabulous projects you can see Vicki's Halloween Crow Canvas, Sheila's Love Lives Here and Sewing Card, and Kathy's Mini Box Tutorial! 

My friends are all becoming Grandma's and I needed baby gifts and instead of a card I love to make and give a Baby Postcard keepsake using our Baby Girl Postcard Set which are on SALE for $6.95 - but they don't have the chipboard, but enough extra sheets to make 18 postcards and include the mini stamp set. You can also make great garlands.


I found these adorable bunny mini blankets on amazon for $12.95 by Bunnies by the Bay and the lined with pink satin, embroidery and so soft and cuddly.  I've given away 3 bunnies as gifts with one of our little postcards  and stamped the back.  I had a piece of the original chipboard and stamped it in brown - but you could easily trace and cut the shape from white or pastel cardstock.

Here's a close up. Gee - there I go again using my Sakura Clear Gelly Roll Pen to add some sparkle. What can I say - I'm hooked and girls need sparkle.


After I bought the bunnies I saw that they also have super cute bunny slippers and  adorable little coats, they are so cute they make me want to be a grandma! Hey: daughters, hint, hint, - did you hear that? Hmm.. I guess they better get married first.

October is almost here and the DT ladies have been creating some great Halloween projects like this cool banner Vicki Chrisman created using paper and images from our Halloween CD.  You can see more Halloween CD samples here on our Pintrest Page


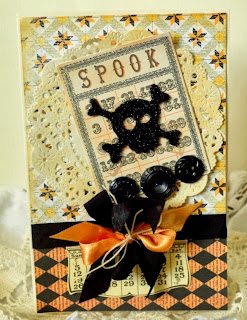
DT Member Rebekah Fairies printed papers and one of the Halloween Bingo cards from the CD to make this cute Halloween card.  Rebekah also added the October month from our Calendar Scraps on SALE for $1.25


DT Member Michele Kovack posted this pretty card on her birthday while I was gone using our Digital Jumbo Flower Set for $9.95 with 37 digital stamps and 2 fonts.

DT Member Darlene Pavlick created a bunch of beautiful floral bird cards using 1 sheet of our Birds and Blossoms Creative Scraps on sale for $1.95 - and she still had images left. See her other cards with link above.


DT Member Elizabeth Lincoln got a head start on her Christmas cards and made and assortment of pretty holiday cards you can see with the link.  I love this one where she has 2 of the children from our Winter Wishes Stamp Set looking out a die cut window.


We had a big family dinner here this weekend and I made these Whipped Feta and Tomato Crostini's  from NutritiousEats.com and they were so delicious we devoured the first plate before I got a photo (drat, it looked way prettier). I threw this one together with the leftover bits and even my niece Arissa loved them. I just drizzled mine with a bit of Fig Balsamic Cream - yum! I bought it in Italy but Traders Joe's sells Balsamic Glaze from Italy now.


I have a bunch more healthy recipes I need to add to my Yummy Healthy Food Folder and I will be back during the week with a fun tutorial and template showing how you can custom print your own Post-it-Notes.  Plus, there will be some new releases!

Hope you had a fab weekend
Wishing you joy and creativity

Sandy


See Our  CraftyVintageGirl.com Store
 Our Online Shopatron Store  (sorry No digital downloads)
Visit us on Facebook with over 5500 Fans!  
This Blog: http://heartwarmingvintage.blogspot.com 
Our Websitehttp://www.craftysecrets.com
    

Toll Free Phone or Fax 1-888 597-8898
Local Phone 604 597-8817

 
 Crafty Secrets Head Office
15430 78 A Ave.,
Surrey, BC V3S 8R4


USA Warehouse
250 H. Street, #436
Blaine,WA 98230


Monday, September 16, 2013

Little Boxes, Little Boxes: Guest Blogger Kathy Clement


Good morning all.  It's Kathy Clement from Kathy by Design here, filling in for Sandy, who is still enjoying a romantic anniversary trip to France and Spain.  She'll be home soon, but while she's gone I thought I would pop in here and share a few photos and a tutorial for a fun project I've been working on this week. 

I love little boxes.  There's something wonderful about a small box, wrapped with a ribbon or decorated for gifting that just makes my heart happy.  I keep a small pad of sticky notes next to my desk so that I can jot down ideas or lists while I'm working.  I also use them for masking off on a project.  But I don't like it when the edges of the notes get all curled up and ratty looking.  So, the perfect solution is to keep them in a box.  

I made two boxes using two different paper sources. For this box
I printed my own double sided paper using the Creating with Vintage Halloween CDI was able to choose a weight of paper that worked perfectly for making a little box.  Here's the inside:
I was happy to find so many papers and images on the Halloween CD that would work well for general fall/autumn projects as well as papers and images that are specific to the Halloween holiday.  Versatility is a good thing!

The second box I created was made from Sew Nice Creative Scraps.  The paper these scraps are printed on is absolutely perfect for making these little boxes!


Sandy has all these wonderful Creative Scraps on sale for just $1.95, so now is a good time to stock up on them.  I think these little boxes would be fabulous as hostess gifts during the holidays, teacher appreciation gifts (teachers love sticky notes!) and great to have on hand for little last minute gifts.  They are super cute, quick to make, and unique.  I think people really appreciate a hand made gift, don't you?

So, here's the tutorial, in pictures with text:
  
If you are printing your papers, as I did for the first box, just select the pattern you want, and run a good heavy weight cardstock through your printer.(I use Stampin' Up because it is just the right weight, but you can use whatever you have on hand.)  Flip that paper over, and run it through the printer a second time with the pattern you wish to use for the inside of the box.   You will need two 6 1/8" squares: one for the top, one for the bottom.

If you are using the Creative Scraps, you can get both 61/8" squares from the same sheet!


 Score both squares at 1 1/2" on all four sides. Crease with a bone folder.


Box Base: Cut each of the four corners from the base of the score line to where it intersects with the box, as shown. Use a strong white glue on each of the four tabs.


 Fold these tabs in and behind the middle section on each side. 

Try to line them up straight with your scored lines.  This will form your box base.  Use clips or clothespins to hold in place until the glue dries.
For the box TOP:  Cut one side of your square from the score line to where it intersects with the box, just as you did before.  On the opposite side, cut the two 1 1/2" squares completely away, leaving only the larger middle flap intact.  It should look like this:
Use a corner rounder on each back corner, if desired.  This is not necessary, but it does give the box a more finished look.  Once you've rounded your corners, add the white glue to the middle flap and attach it to the back of your box base.  This forms the hinge for your little box.
Now that your box is complete, you can simple decorate it and fill it with sticky notes, chocolates, sewing notions, or whatever gift you choose.


I used another printed paper from the Halloween CD to die cut my flower on this box, and then I cut out and added images from my Seasonal Image and Journal Notes Booklet The butterfly had already been cut out and was in my folder, but I think it came from the Altered Fairies Creative ScrapsI hand cut the leaves, scrunched them up and inked the edges a little, then treated the entire top and sides of the box with Studio Multi Matte Medium so that it would be water resistant.  I did not have any problems with the ink running on my printed papers, because I heat set the ink with my heat gun before working with it.  This works really well for me.

So there you have it.  Cute little boxes, all ready to fill and give as gifts!  Don't forget to make one for yourself so you don't feel left out!  The box I made with the Creative Scraps only took about 20 minutes to make from start to finish because the paper was already decorated.  All I had to do was add a frame and a couple little embellishments. 


 Thanks for stopping by!  Be sure to visit the other gals on the team so you can see what they've been up to.  They always have great ideas for using your Crafty Secrets goodies.  Wishing you joy and creativity,

Kathy...filling in for Sandy...who will be home soon and crafting with a French accent!  LOL

 
Links to design team blogs:


 Elizabeth Lincoln