Monday, April 25, 2011

Paper Piecing With Clear Art Stamps DT Challenge - 7 Reasons to Try It!

Today is our Design Team Challenge and the theme is Paper Piecing! I’ve only seen a few of the DT ladies projects, so like you - I’m excited to see what they have created!

Please click on each link to our DT ladies Blogs to see their creations. This will be the last month for our DT members Flo Teixeira and Mary Hamer and we will miss them! I want to thank them for their fabulous creations and I hope you will join in and wish them all the best.

Vicki Chrisman  Design Team Leader

Pam Hooten

Heidi Blankenship

Linda Duke

Michelle Kovack

Melissa Phillips

Julie Campbell

Flo Teixeira Leaving us

Mary Hamer Leaving us

Our Guest Designer this month, Sophie La Fontaine joined in the fun and created a card I’m posting here as she doesn’t have an active blog. She used our Little Boy Clear Art Stamp set to stamp clothes from various pattern papers. She colored the rest of the stamp with watercolors. You can see Sophie's gallery of samples HERE on Spiltcoaststampers!

.

I decided to make a list of reasons to try paper piecing. I likely missed something, so if you think of any please leave a comment. Paper piecing with stamp designs is fun and it has enough advantages it’s easy to see why it’s popular.


7 Reasons to Try Paper Piecing!


1. You can keep it simple or complex. Depending on the stamped image you choose and how many pieces you want to stamp, cut and paper piece you can create simple to elaborate layered projects. 

DT member Pam Hooten simply stamped the little girls sweater on pattern paper to create the perfect little cardigan using our Little Girls Clear Art Stamp Set.  Scallop border and sentiment stamps also used.


2. It can really add character as it allows you to add patterns and designs that would be difficult to draw and/or color on a stamped image.

DT member Julie Campbell stamped the tie from our Favorite Fellas set on 7 scraps of paper and cut them to 'hang on her clothes line'.


3. You may be able to finish a project faster. Without having to color all or parts of the design now that you have stamped them on color paper.

Pam stamped the teapot and cup from our Tea with Alice set on floral paper to create this lovely and quick tea set and then she stamped the 'curls of steam' and sentiment.


4. It can add dimension. Use pop dots between layers to create a 3D effect.

DT leader Vicki Chrisman raised her flowers and petals up from our Art Blooms Set


5. It’s a great way to use up scraps of paper. You don’t need to cut up your new paper, you can use old scraps.

Look how past DT Member Lisa Zappa stamped ornaments form our Christmas Joy set.


6. It can help you tie in co-coordinating colors and designs. Look for matching colors but you can change the materials and textures for fun and interest.

See how DT Member Pam Hooten used the same check paper to stamp overalls for the boy from the Little Boys Clear Art Stamp Set.


7. A solution if you don’t have the right shade to color with, you can use colored paper instead.

This isn't a stamped project, I did come across this pretty Little Girls Chipboard Outfit that DT Leader Vicki Chrisman paper pieced with tiny squares she cut, glued and went over the edges with a sewing tracing wheel to add the faux quilted stitching.  We are out of stock of our cute mini hangers but working on finding a new supplier!


Lastly, here are links to two new beautiful Easter projects with designer Michele Kovack's egg card HERE and Heidi Blankenship's Angel Card HERE.
 
I will be back soon with more  ideas and inspiration
 
Wishing you joy & creativity
 
Sandy Redburn

Owner
Crafty Secrets


Visit Our Store Locator
Visit Our Online Store Here


This Blog: http://heartwarmingvintage.blogspot.com/
Our Website: http://www.craftysecrets.com/


Toll Free Phone or Fax 1-888 597-8898
Local Phone 604 597-8817

Crafty Secrets Head Office
15430 78 A Ave.,
Surrey, BC V3S 8R4

USA Warehouse
250 H. Street, #436
Blaine, WA 98230
Thursday, April 21, 2011

Easter Gift & Vintage Printables, Blog Winner and Great New Samples!

Hi Everyone, 

I forgot to mention our Free Vintage Easter Printables on the last post but over the last few years I periodically add vintage printables and I have a sweet new one today! Here is a link to a previous pretty B&W illustration of children & Easter sheet music and here is our beautiful angel in an embossed floral egg. Once you click on the link, left click the image once or twice to get it big, then right click it to save it to a picture file. All of our free printable images are are for personal use only.
This new image today is a gift from Muriel, a kind and loving lady who follows this blog and wrote me about her blind diabetic dog after reading about our Otis and we became pen pals. She is 88 and fighting cancer so I sent her a box of Essiac Tea and she offered to send me some of her enormous antique postcard collection! Yippee - I told you she was sweet!  Please say a prayer for Muriel.

The card above was among the first box Muriel sent that are being lovingly scanned and mailed back. I picked this cute girl because she can work for more occasions than Easter. The colors and her face were spotty, so I dry brushed the image in Photoshop and added a bit more blue to the sky. I hope you like it.

We also have a winner for $35.00 blog giveaway and it was Heather who said...Such wonderful projects, I truly like all of them! I really enjoy seeing all the neat things that your design team comes up with. Thanks for hosting such a fun giveaway!


Look at this cute card DT Leader Vicki Chrisman created using a sweet image from our Vintage Photo Scraps The text background is from our Artsy Banners stamps sets.  You can get all the details HERE on Vicki's Blog. and check out her creative studio on this post HERE.


The combination of the Farm Chicks stamps and colors that DT member Michele Kovack used make this card so down home cute and and inviting. I love the way she added the jute and stamped and layered the Grade A and egg basket stamps in the corner. See details HERE on Michele's Blog.


DT Member Melissa Phillips used an image from our Family Cotton Scraps on this pretty card and the colors and embellishments work so great together. You can get the details HERE on Melissa's blog if you scroll down. Besides Family Cotton, we only have 4 themes left in:Spring, Fall, Girl Time and Romance. I love the way you can fray the edges.

Check out this pretty Spring album that DT member Mary Hamer created using a mix of our images from our Birds & Blossoms to the Sew Nice Creative Scraps.  You can see more detail and samples HERE on Mary's Blog.


I have more watercolor cards to show by our April Guest Designer Sophie La Fontaine! For this Royal Magical Birthday card Sophie says she used Clear Art Stamps from: Little Girls, Altered Art and the Bonjour Merci set. "I put glitter on her bow, crown, star, butterfly, and sentiment ornamental swirls".


This is such a cute idea how Sophie stamped the balloon stamp from the Little Girls set with the puppy from the Little Boys set and popped them up to create a layered in flight look.


Gift Wagon Boy: Sets used:  Little Boys and Mouse Party. I drew his hat
 and put glitter on the polka dots and gift wrap ribbon.
Sophie created this card for her nephew to celebrate his new job as 'Ice Cube Boy'.  She says she used the Little Boys and Card Sentiments sets and didn't ink up the boy's hands, so she could redraw them in the new positions. Then used a ruler to draw the fridge.


On this fun card Sophie uses a combination of Clear Art Stamp Sets from Car Classics, Bug'sLife and the L for her nephew Luke is from Artsy Alphabet. You can see many of these cards now in Sophies Splitcoast gallery, where she lists all the supply details

Lastly, I wanted to tell you about the challenge HERE Joanne Allison is hosting over at Splitcoast to use your 'Pearly Whites' (pearl gems, pear paint, pear anything) with any of our products.  Anyone can play and here is a link to the Gallery.

I hope you get to spend a wonderful Easter weekend with
the people you love and care about!

Sandy Redburn

Owner
Crafty Secrets

Visit Our Store Locator
Visit Our Online Store Here

This Blog: http://heartwarmingvintage.blogspot.com/
Or Website: www.craftysecrets.com

Toll Free Phone or Fax 1-888 597-8898
Local Phone 604 597-8817

Crafty Secrets Head Office
15430 78 A Ave.,
Surrey, BC V3S 8R4

USA Warehouse
250 H. Street, #436
Blaine, WA 98230
Saturday, April 16, 2011

Blog Giveaway, Great Copic & Watercolor Cards, Video Tutorial & Pretty Scrap Samples

Hi Everyone,  Sorry for the delay with this blog post, life got in the way.  I do have a fun Giveaway for 3 of the Image & Journal Notes Booklets we just had reprinted and I picked our Happy Easter stamp Set but the winner can pick any items worth $35.00 if they prefer and we will cover the shipping. I will announce a random.org winner next Thurs, April 21/11.


I like the changes and colors in the revised Birds & Botanical and Childhood so much more I put the old ones on sale ($2.00 off) for $4.75 while quantities last. The Christmas Booklet was fine and didn't need many changes.


DT Member Heidi Blakenship designed this stunning birthday card using our Poppy Clear Art Stamp set, with the Dragonfly.  The border and the background text stamps are from Artsy Banners and the pretty sentiment is from our Angel Blessings SetHeidi gives great step by step instructions HERE on her blog

Look at this super pretty 3D Shadow Box that DT Member Julie Campbell created using an AccuCut Portrait Shadow Box ( by designer Vicki Chrisman) and embellishing it with our Altered Fairy and Love Mail Creative Scraps. The pearls and ribbon add extra pretty appeal.


Julie also made this lovely thank you card after winning a great prize package. The bashful lady is from our Girlfriend Creative Scraps and you can get details HERE on Julie's Blog.


I have a couple of very charming cards by Tammy Roberts our Guest Designer last month .  I love the sunny warm yellow of this card and how well it goes with the pinks and image from our Little Blessings Creative Scraps.


Tammy used one of the poems from our Love Mail Creative Scraps on this card
and it turned out so pretty!  You can see the posting HERE on her blog


Remember last week when I posted a link to the video Beate Johns did on how to paint with bleach?  She sent me a link to a new Video Tutorial she made on Stamping With Bleach  and she used our Love you Mother Clear Art Stamps.


I have more inspiring and fun cards by our April Guest Designer Sophie La Fontaine!        On this adorable card Sophie used the little girl and rose from Thinking of You, She drew the picture frame, window and curtains and stamped the border. The barn is from our Down on the Farm Stamp set, the little house is from the mini stamp set in our Family Postcard Kit.


This card crack me us with the way Sophie stamped the barn again and the sheep reading from our Book Lovers stamp set. She used a Cuttlebug and Divine Swirls for the sky and you can read all the details and full supply list HERE on her Splitcoast Gallery.

Here is a new card Sophie stamped with our Feel Better stamps and colored with Copic Markers. I like the way she has the nurse holding a big flower she stamped with text and how she just painted a long stem.

This card is older but I wanted to show how she used the same Feel Better set and has the nurse holding the medicine tray and drew a bed for the little bear stamp from the set.
I wanted to show you the 'Story of Me Stamp Set' that Sophie used on the next card, so you could see how she transformed the little boy into a little girl.


Recipe Book Girl - Sophie says; "I made this card for my niece and so turn the boy into a girl I drew little hairbows and pigtails, added ruffles to the socks and shorts, cut off the top tuft of hair. Oh, also I colored the shoes like black Mary Janes."  Stamp sets used: Child with book from Story of Me, Shelf supports from: Frame It, Foods & "Recipes" from: Kitchen Classics, Wall design from: Floral Art, Girl on book's cover and decorative shelf from mini stamp set in: Kitchen Mail Postcard Kit
Car Lover Boy Sophie says; "I made this card for my nephew Luke who loves cars and I had fun painting flames on the car." Clear Art Stamp sets used: Boy with Book: Story of Me, Large & small car and flag: Car Classics.  Word ‘Imagine’ from Story Time Vintage Postcard Kit

Don't forget to enter our Giveaway by leaving a comment here on the blog.  

I came back to edit this and ask a couple of questions if you want to include any feedback in your comment. Do you prefer to have stamp sets with several separate pieces you can build with, or do you like layered collage style designs better? Do you ever buy digital stamp downloads or would you be interested? 

Note: I will be posting details on our first CD, Creating With Vintage Patterns next week and I'm over the moon excited!

Thank so much for your support!
Sandy Redburn
Owner
Crafty Secrets


Visit Our Store Locator
Visit Our Online Store Here


This Blog: http://heartwarmingvintage.blogspot.com
Our Website: www.craftysecrets.com


Toll Free Phone or Fax 1-888 597-8898
Local Phone 604 597-8817


Crafty Secrets Head Office
15430 78 A Ave.,
Surrey, BC V3S 8R4


USA Warehouse
250 H. Street, #436
Blaine, WA 98230
Tuesday, April 12, 2011

Great Mother & Easter DT Samples, Bleach & Copic Video, Challenge, Plus - More Watercolor Cards & Tips!

Hi Everyone, 
I have a bunch of great projects to share with you today like this wonderful frame and card DT Member Pam Hooten created with our new Love You Mother Clear Art Stamp Set. Pam also used our Artsy Banner stamps to create the little banner on the frame with her as the cute baby! See Details HERE on Pam's Blog and read about her Memphis adventure.


DT Leader Vicki Chrisman designed two popular folding 3D Shadow Box Frames in Portrait and Landscape style dies for AccuCut. We need to get an updated list of stores that have either die, as often you can use the die to cut frames for a small fee or free if you buy the cardstock from them. We sell the Landscape and Portrait kits with 3 pre-cut frames but it's hard to know what colors people want.  Vicki has recently opened a little Etsy Store and will soon offer them with photos showing the cardstock she used. 

Look at this wonderful Portrait style 3D Frame Vicki created with a photo of her mother while growing up on a farm in Nebraska (details HERE). I love how she used parts of our Farm Fresh Scraps and the paper doily pieces to embellish her frame. You can see another 3D Frame by Vicki featured HERE on the Scrapbooks Etc site using her #1 favorite Scrapbook Adhesive by 3L. She says the double sided tape fits and holds the sides of the frames perfectly.  You can also enter her 5 year Blog celebration Banner Giveaway HERE.


Okay, now some pretty Easter projects to get you in the mood for Spring! DT Member Linda Duke created these adorable bunny cards using our SM24 Happy Easter Clear Art Stamps colored with Copic Markers.  I love her shading and and the oval Spellbinders egg shaped dies she used. Get all the details HERE on Linda's Blog.  Click on photos to enlarge!


Here is a very sweet little layout by DT Member Julie Campbell, who used our Easter Single Sided Creative Scraps to create this layout of her mom as a child. Details on Julie's Blog. The Easter and Wacky Animal Scraps are the only 2 we have NOT re-printed in the 'double sided format'. They are on sale for $2.50 retail to clear out (and on sale for stores). 


I have a fabulous new tutorial video by Beate Johns from Splitcoast on using a bleach technique with clear embossing powder and adding some color after with Copic Markers.  Beate used our SM Roses Clear Art Stamp Set and look at the beautiful card she created!

She makes it look easy with step by step instructions here on Splitcoaststampers.com
Here is a close up where you can see she has colored on the pale yellow petals with Copics.
Every cardstock reacts differently to bleach so she says to test different ones.


Here is a fun challenge Darlene Pavlick posted HERE today over at Splitcoast Stampers to create something with 'Yellow' using any of our products. Look at this pretty card she made using the Daffodil image from our Birds & Botanical Booklet.  See the Yellow Gallery and come join in!  Note: We just had this booklet reprinted and revised several pages and it looks so great, I just put the last box of original booklets on sale for $4.75 each.  We will get the new booklets in this Friday and I will post details but this daffodil image is the same.


Now I have a some watercolor samples and tips by our April Guest Designer Sophie La Fontaine!  I spotted this adorable Easter card here in Sophie's Gallery on Splitcoast and had to show this cute scene she created in honor of her nephew in his first bunny suit.  Clear Art Stamp Sets used:  Bunnies & chick stamps from: Happy Easter, Tree: Garden Girls, Letters for "Baby": ABC Top Hat, Butterfly: Best Buds Vintage Postcard Kit See past Tips HERE if missed 

This card is titled 'Fan of Cheese' and it made me laugh out loud. Love the way she stamped the mouse gazing at the cow and caption 'Celebrate Cheese', (which my family loves).

Another fun card using Mouse Party and Garden Girl images
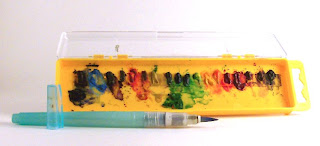
Sophie says she put together a small, portable watercolor palette for herself and quote: "I bought a Crayola set of watercolours and removed the Crayola paints (they fade quickly and one might be disappointed in later months if used on cards). I squeezed a little bit of pigment from my Winsor & Newton watercolors onto it.  I also carry a little jar so I can add a little water and I'm good to go. 


The order of colours in the palette (see above photo): Aquamarine blue, Indigo blue, sky blue, purple, brown, pink, burnt sienna (pale skin tones), yellow ochre, viridian green, viridian green, viridian green, yellow, red (but I consider it orange), crimson, brown, brown, black. On the bottom middle: plant green. This just happened to be on the bottom 'cause I ran out of room, and also, it was added much later than the earlier colors.

I love to see stamp sets used in unique ways you wouldn't expect and this is a great example. Stamp Sets Sophie used:  Car in Garage from: Car Classics, Roof: Artsy Banners, Fence: Hardware, Siding: Frame ItSophie says she drew the garage door, walls and curtains. Rectangle Nestabilities die (for window)
This 'Girl in the Window' card uses the same idea to be inventive and look at all your stamp  designs to see new possibilities. Sophie used the scallop border from the Little Girls set to stamp the girl, flowers, balloon and roof shingles. She used the Fleur-de-lis from Artsy Banners to make the wallpaper behind the girl and Down on the Farm set for the tufts of grass. Rectangle Nestability used to cut out the window. Used real thread for balloon string, sponging to create the siding, and foam tape under the balloon.


Lastly, I adore this cute card Sophie made for her new nephew and I swear I saw this exact face on the real moon last month! Now I know why it's famous drawing over 100 years old.
Title: Mouse can't sleep: Stamp sets used: Mouse Party and moon from Costume Cuties. Card for Baby Michael. He sleeps so much (he IS a baby) - does he ever get tired of sleeping? When this little mouse can't sleep, he goes to admire the moon.

 
Whew - this was a long post with lots of links but there were so many things to show you.  I hope you enjoyed it. 
Please leave any questions and comments!


Wishing you joy & creativity


Owner
Sandy Redburn

Crafty Secrets
Visit Our Store Locator
Visit Our Online Store Here


This Blog: http://heartwarmingvintage.blogspot.com
Our Website: www.craftysecrets.com


Toll Free Phone or Fax 1-888 597-8898
Local Phone 604 597-8817

Crafty Secrets Head Office
15430 78 A Ave.,
Surrey, BC V3S 8R4

USA Warehouse
250 H. Street, #436
Blaine, WA 98230


Thursday, April 7, 2011

Watercolour Tips from This Month's Guest Designer, Sophie La Fontaine

Hi Everyone!


Back today, as promised, with some wonderful water colouring tips from our talented Guest Designer this month, Sophie La Fontaine.   We love the way Sophie makes scenes with stamps on her cards and layouts, and today she shares some of her methods with us.


1. Cut watercolour paper (I use Strathmore's 140 lb cold-pressed) to 3.75" x 5". This size would layer nicely onto a typical 4.25" x 5.5" card.


2.  Choose the stamp sets you'd like to use.  Roughly lay out the stamps in the positions they would occupy in the scene (see photo). When stamping, make sure to use a waterproof ink. I use Palette Noir, but any other waterproof ink is fine.


I used the masking technique with a post-it-note over the mouse to stamp
the TV after and then stamped the car in the TV.


3. Start painting! You can paint anything in any order you'd like. For me, I started by painting the wall. After the paint dried, I painted the carpet. Do wait for the paint to dry, or the new colour might "bleed" onto the first (still-wet) colour. I painted these large two areas (wall and carpet) first because it made me feel like I was accomplishing something since it LOOKED like most of it was coloured by now. 


Clear Art Stamp Sets used on this card: TV and saying from SL 06 Favorite Fellas, Mouse from: SM26 Mouse Party, Cars & keys from SL30 Car Classics. Flowers are actually the tiny tree from: stamp set in Family Postcard Kit. Shelf she hand drew but brackets are from SL07 Frame It.  NOTE: Of course you may not have all of these set (Sophie has bought several of our sets). I also sent her some for being our guest DT. I do hope seeing so many stamp sets mixed together inspires you to look at your stamps in a new way!


Watercolour tips:
For those with no watercolors: I bought a starter kit of student-grade watercolors at Michael's with a 40%-off coupon. I also bought a waterbrush , but a paintbrush would also be fine. Just make sure the tip of the brush is nice and pointy to allow the tip to get into tiny spots and make very thin lines. When the tip gets frayed, it's time to buy another brush.


 For paper, pick a brand of watercolor paper and stick with it, since different papers absorb colors at different rates. I use Strathmore's 140 lb cold-pressed watercolor paper. The surface is a little bumpy, so a few stamped images may not come out all the way. In these cases, one can stamp on the reverse side, which is a little smoother, or get a waterproof pen to fill in the lines. I use PITT pens, not just to fill in lines, but also to draw a little bit, here and there, or to add my own sentiments.

The cool thing about watercolors is, one tube can produce a whole range of tones, from almost white to intense vivid color. The difference is in the water added. Lots of water produces a pale shade, and almost no water produces a rich color.


For the darkest colors, make sure the brush is almost dry, with just enough water to move the paint from the palette to the paper. If it isn't dark enough, I mix in a darker shade of the color, or a darker complementary color. For example, for the dark points of yellow, try mixing with dark brown, dark orange, or black. For the lightest colors, add enough water to the pigment and test it on a scrap of watercolor paper (with time and practice, you can tell if it's light or dark enough without constantly testing it). If not pale enough, add more water.

For most art, what pleases me the most is the range of shades in a piece of artwork, from the darkest darks to the palest lights. This card was for my husband when his soccer team lost.  Clear Art Stamp Sets used below: TV, Trophy from SL06 Favorite Fellas, # 2 from SM14 ABC Top Hat, Crying Bug from SL31 Bugs Life, Ticket from SM10 Journey, Push Pins from SM28 Office 101 (she drew note paper), Sentiment from SL02 Card Sentiments.


For painting backgrounds, it is useful to paint wet-in-wet. This is when one spreads a lot of paint onto the paper (a "wash") and then quickly introduces new paint into the old paint (before the old paint dries) and continues to spread it. This way, one can avoid a lot of "hard lines" which happen around the edges when paint dries. Clear Art Stamp Sets used below: SL31 Bugs Life, Sign from SL19 Fairyland, Eiffel Tower from SM03 French Mail,


For rosy cheeks, I apply pink or red paint FIRST and THEN follow after with a pale wash of burnt sienna (my go-to skin color) making sure to color all the face areas first and then the (already pink) cheeks LAST. This way, the other areas of the face stay un-rosy and there are no hard lines on the cheeks.  Stamp sets used: SM37 Little Girls

For darker skin tones, I like to mix burnt sienna & brown. For pink skin (ears or palms), I sometimes like to mix a little burnt sienna with just a touch of pink. Mouse is from Mouse Party  NOTE from Sandy: I will show the rest of this card and more in the next post and throughout April


Sophie says "I watched tons of how-to watercoloring videos on Youtube to learn visually. One can turn to online videos and tutorials for more tips and in-depth learning. Please take all my tips with a grain of salt because I'm not a professional by any stretch of the imagination! There is a wealth of glorious information on watercoloring on the internet and in bookstores!"

Well, that's it for today!  I hope you enjoyed learning these watercoloring tips from Sophie as much as I did, and a big thank-you to her for sharing her methods and her talents with us! I will be posting several wonderful samples she has created this month and you can see Sophie's gallery at Splitcoast Stampers HERE

I know Sophie would love to hear from you and you can post any comments and questions here as her blog isn't active.

Wishing you joy & creativity

Sandy Redburn
Owner
Crafty Secrets


Our Website: www.craftysecrets.com

Toll Free Phone or Fax 1-888 597-8898
Local Phone 604 597-8817

Crafty Secrets Head Office
15430 78 A Ave.,
Surrey, BC V3S 8R4

USA Warehouse
250 H. Street, #436
Blaine, WA 98230